WaveNotes + Zoom
Wavel integrates with Zoom to provide 99% accurate live interactive transcripts. Students can read, highlight, make notes, and store knowledge for each live class on WaveNotes.
Classrooms have changed dramatically in the recent time and new modes of engagement are much needed. With the WaveNotes, universities can provide accessible lectures to all disabled students and increase the engagement of online learning for every student.
Benefits
- Live Interactive Transcripts for each class or meeting
- Make your audio/video files searchable
- Caption your videos/meetings
- Unique audio+video+text+image notes for each user
- Send recording and captions to your learning management platform or video management platform after the class meeting.
This integration includes two capabilities
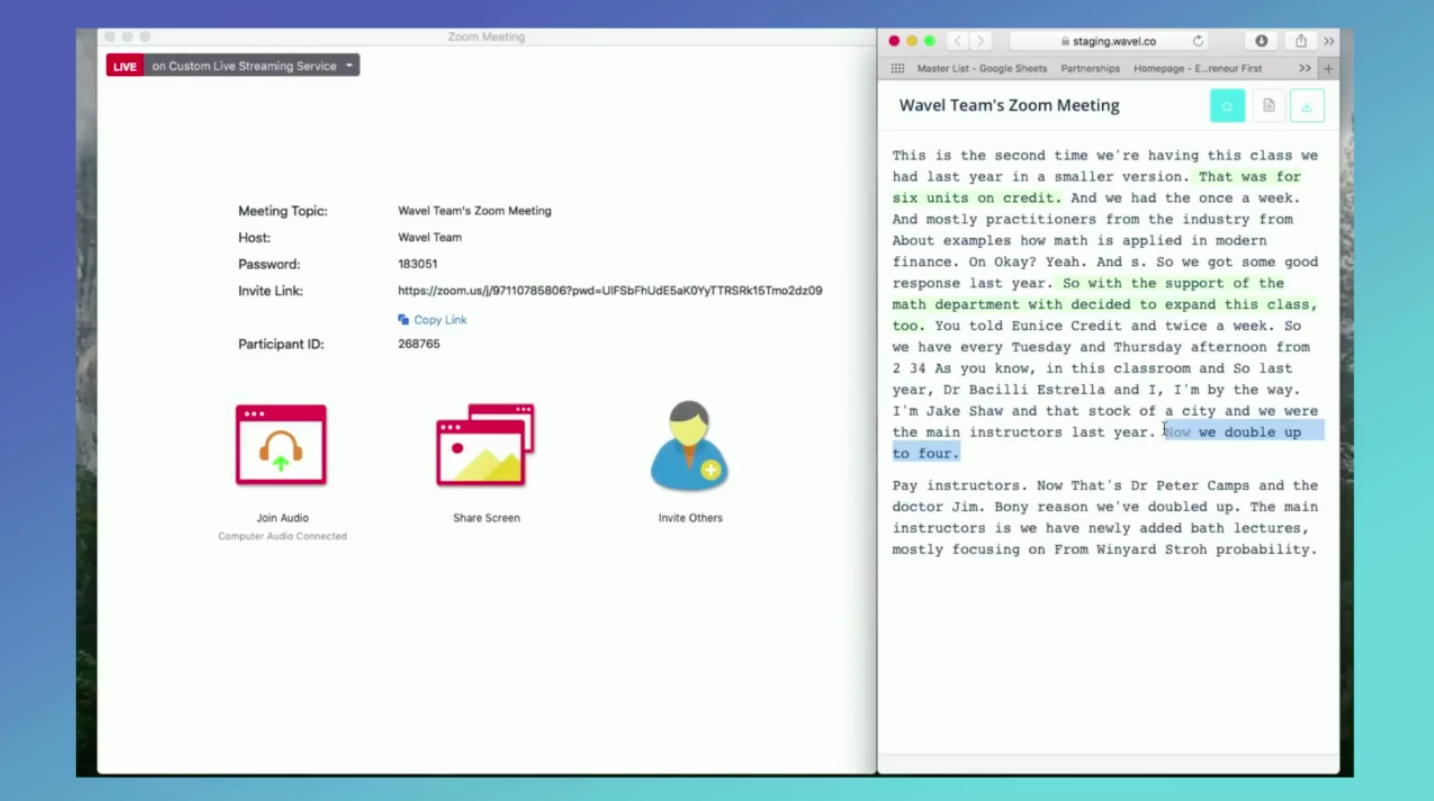
- Live WaveNotes: All Zoom class students can open the WaveNotes live interactive transcripts in the LIVE menu at the top of the Zoom window, Log into Wavel.ai to view, highlight, take notes, and add knowledge. Students can download after the class or read directly from the WaveNotes platform.
- Post-Class Transcription & Captions: Wavel can automatically generate captions and send them back to your LMS or VMS.
Requirements
- Meeting hosts need Wavel contract and Zoom Pro or higher
- Participants can access live transcription for free
- Breakout Rooms and Zoom Rooms are not supported
How to set up WaveNotes for Zoom
The setup is easy and one-time only.
Zoom administrator
Step 1. Allow live streaming in Zoom
Zoom meeting hosts
Step 2. Allow live streaming in Zoom
Step 3. Connect Wavel to Zoom
Note: Your Zoom administrator needs to perform Step 1 once for the entire organization. Every meeting host needs to perform Step 2 once.
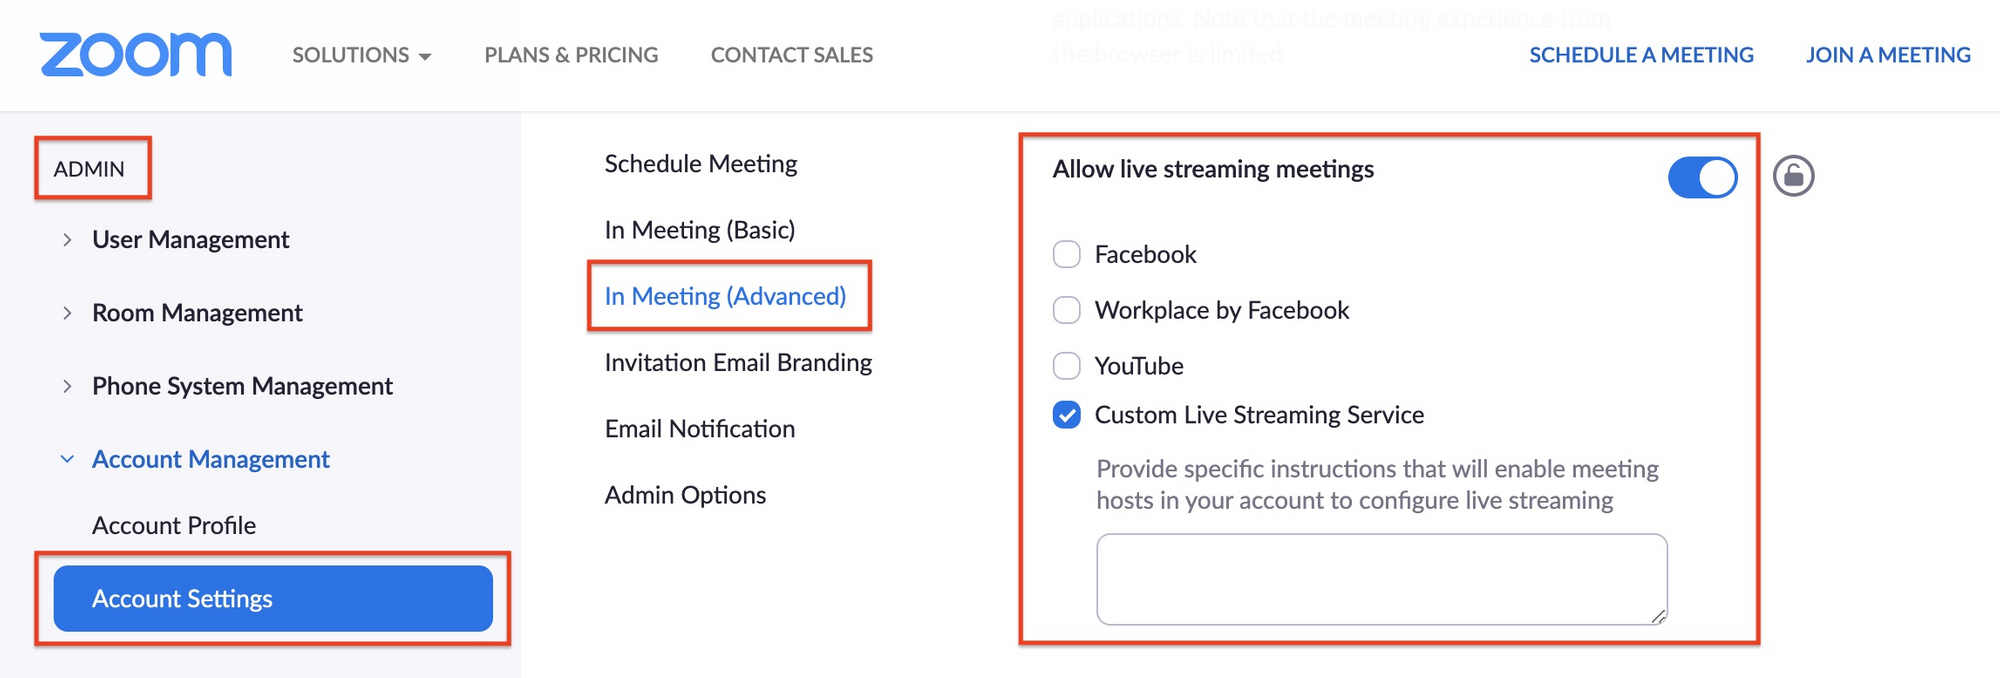
Step 1: Allow live streaming in Zoom (admin)
- Sign in to Zoom as an administrator.
- Under Admin, click Account Management, and then click Account Settings.
- In the Meeting tab, configure the following settings:
- Allow live streaming meetings: Enabled
- Custom Live Streaming Service: Enabled (it’s not necessary to insert or edit the text box)
Step 2: Allow live streaming in Zoom (host)
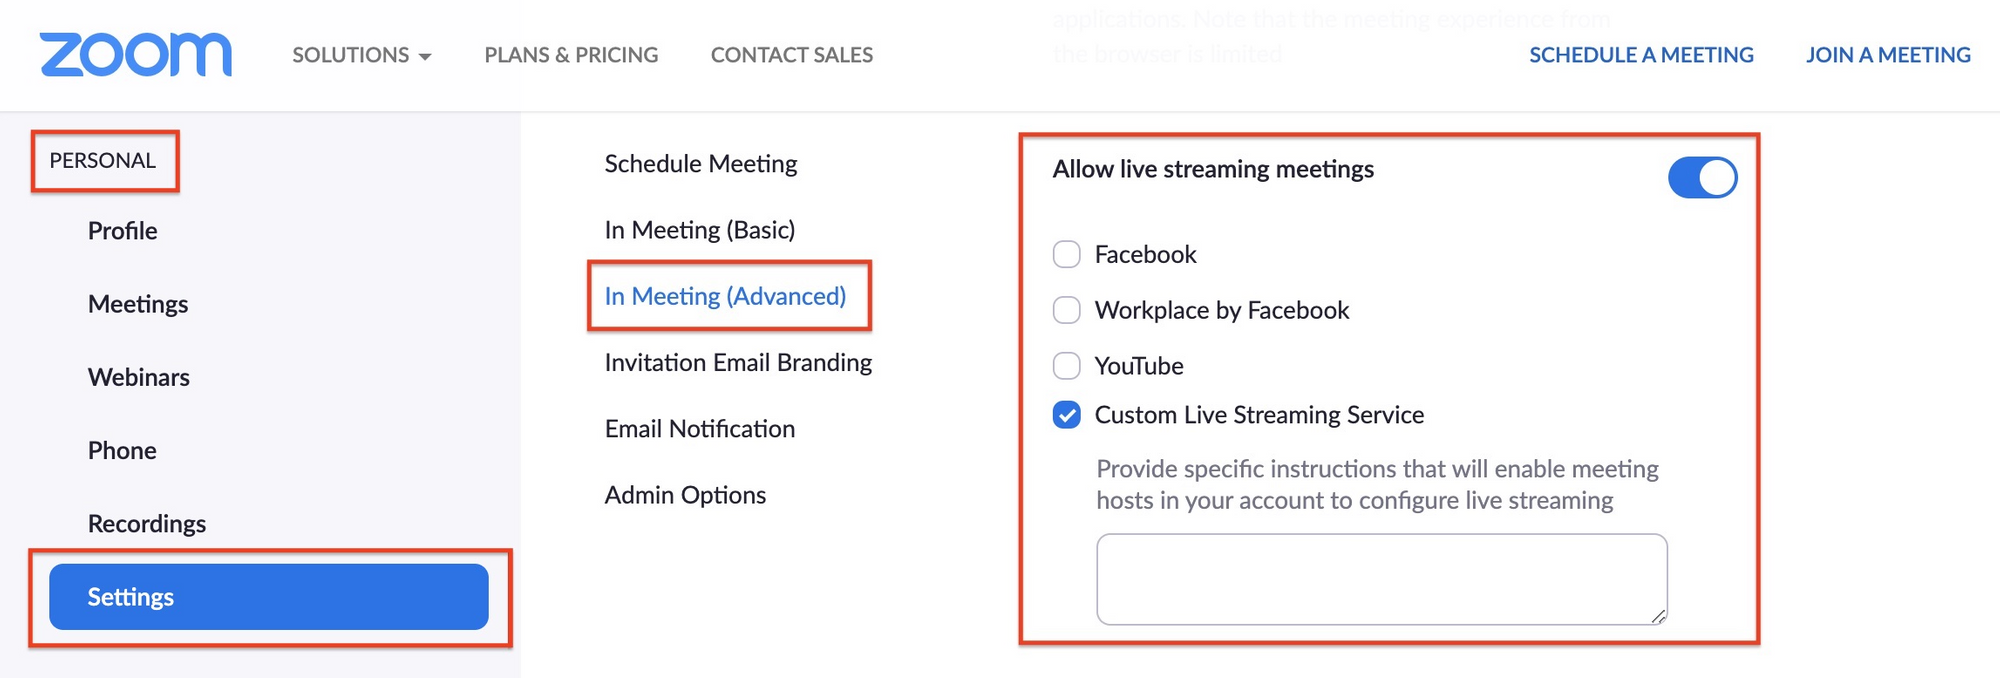
- Sign in to Zoom as a meeting host.
- Click Settings.
- In the Meeting tab, configure the following settings:
- Allow live streaming meetings: Enabled
- Custom Live Streaming Service: Enabled (it’s not necessary to insert or edit the text box)
Step 3: Connect Wavel to Zoom
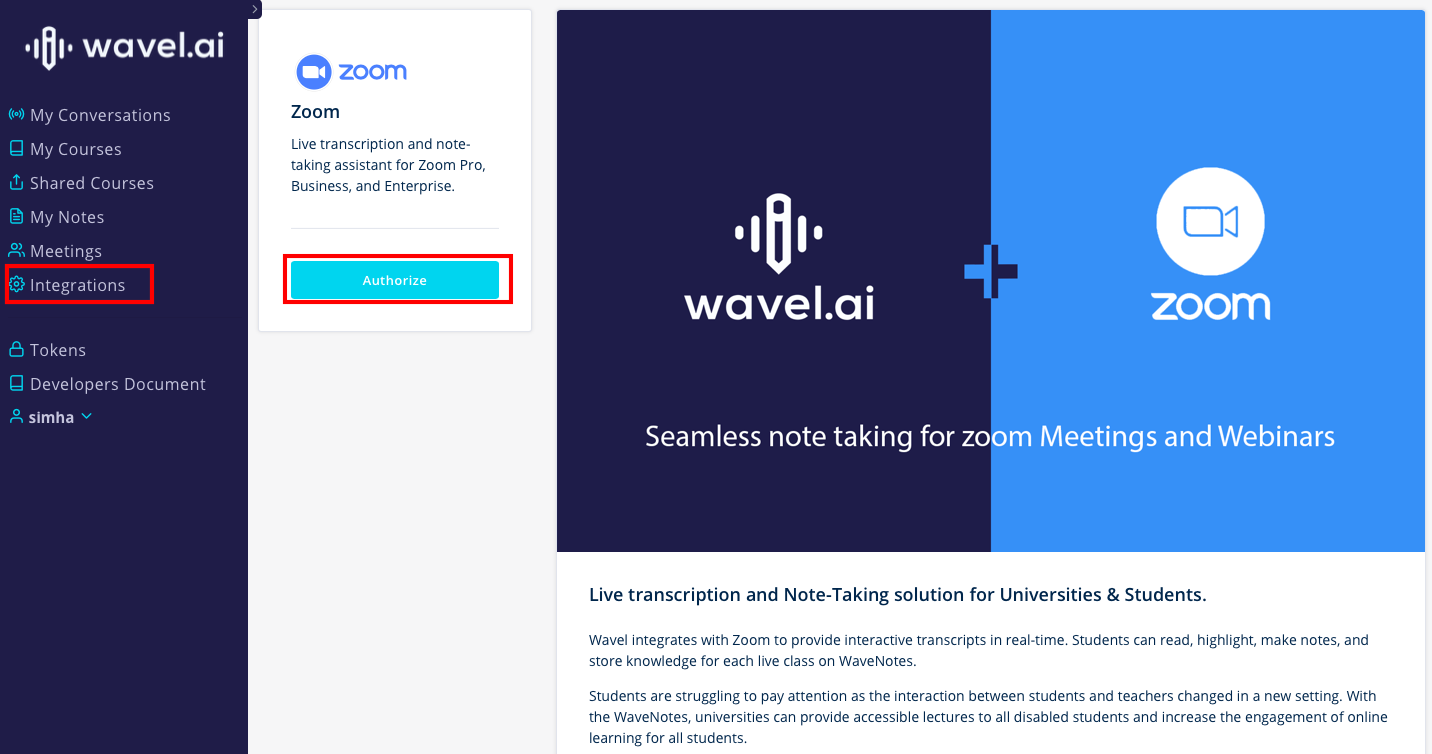
- Log in to wavel.ai, then click Integrations in the left panel.
- Look for Zoom and click Configure.
-
Click on Connect to Zoom
If you are not already signed into Zoom, you would be prompted to sign in
-
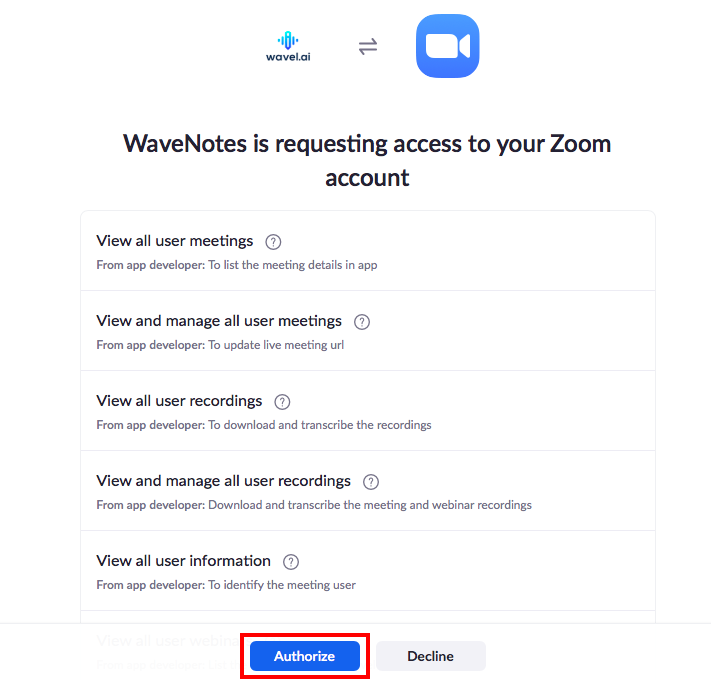
Click Authorize to connect Wavel to Zoom.
How to use WaveNotes for Zoom
Meeting host
- Start live transcription
Participants
- Access the live transcript & Take notes
Start live transcription
- Start a meeting with the Zoom account that is connected to Wavel.
- Click More and then click Live on Custom Live Streaming Service.
- A red LIVE indicator will appear at the top left of the Zoom window, indicating that Wavel has started live transcribing the meeting.
Access the live transcript
Meeting participants can open a live interactive transcript directly from Zoom to follow along and scroll back to read at their own pace.
- Join a Zoom meeting.
- Click the red LIVE indicator and click View Stream on custom streaming in the dropdown.

- Login with your Wavel credentials, you will see live transcripts in the browser window
Adjust browser window to fit next to Zoom window.
Take notes Independently
Students or Participants who are logged into Wavel can highlight, comment, and add photos to create meeting notes as your personal notes, no one can see these notes accept you. If you want you can share with others later on.
- On the live transcript page, click Log in or Sign up for an Wavel account.
- Highlight, comment, and add photos to create meeting notes that are your personal notes.
- At the end of class or meeting, download all notes as single pdf. It will also be stored in your account for later use.
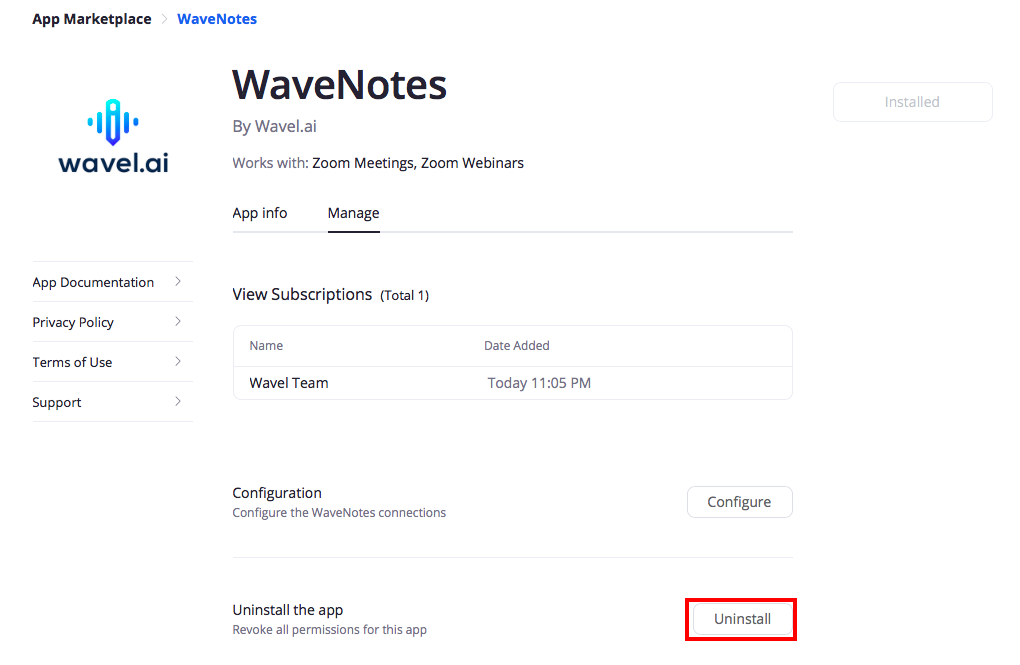
How to Uninstall WaveNotes from your Zoom Account.
- Login to Zoom and navigate to Zoom app marketplace.
- Click Manage > Installed Apps or search WaveNotes
- Click on WaveNotes App
- Click Uninstall.
Write us at reachout@wavel.ai for any help or visit our support page.
